When it comes to vocal recordings, achieving a pristine and polished sound is paramount. This is where the de-esser steps onto the stage. Imagine a tool so finely tuned that it can tame even the sharpest edges of sound, ensuring that sibilant “s” sounds and harsh frequencies don’t pierce through the music. Yes, this is the de-esser – a frequency-savvy compressor designed to gracefully handle those challenging moments in vocal tracks.
Join me as we delve into the intricacies of this indispensable audio processor, unraveling its mechanics, applications, and the art of wielding it to elevate your sound to a professional level.
What is sibilance?
Sibilance refers to the hissing sound produced by the repetition of certain sounds like “s,” “sh,” “th,” “f,” “z,” “s,” “z,” “ch,” “j,” and “sh” in human vocal recordings. Often, due to the sensitivity of microphone diaphragms, these sounds can come across quite prominently in recordings, causing auditory discomfort and disrupting the overall enjoyment of music. This is where the question arises: What does a de-esser do to address this issue? Let’s uncover the magic behind this essential audio tool.
When do I need to use a de-esser?

You need to employ a de-esser when you hear excessive sibilance in vocals or other instruments, such as crash cymbals and electric guitars, where sharp high frequencies typically lie somewhere between 4 and 10 kHz, depending on the vocal or instrument. It’s a common practice to introduce a de-esser every time you detect sibilance in vocals, for instance, after applying equalization and compression. This leads us to a fundamental question: What is a de-esser, and how does it work its magic?
Exploring de-essing techniques
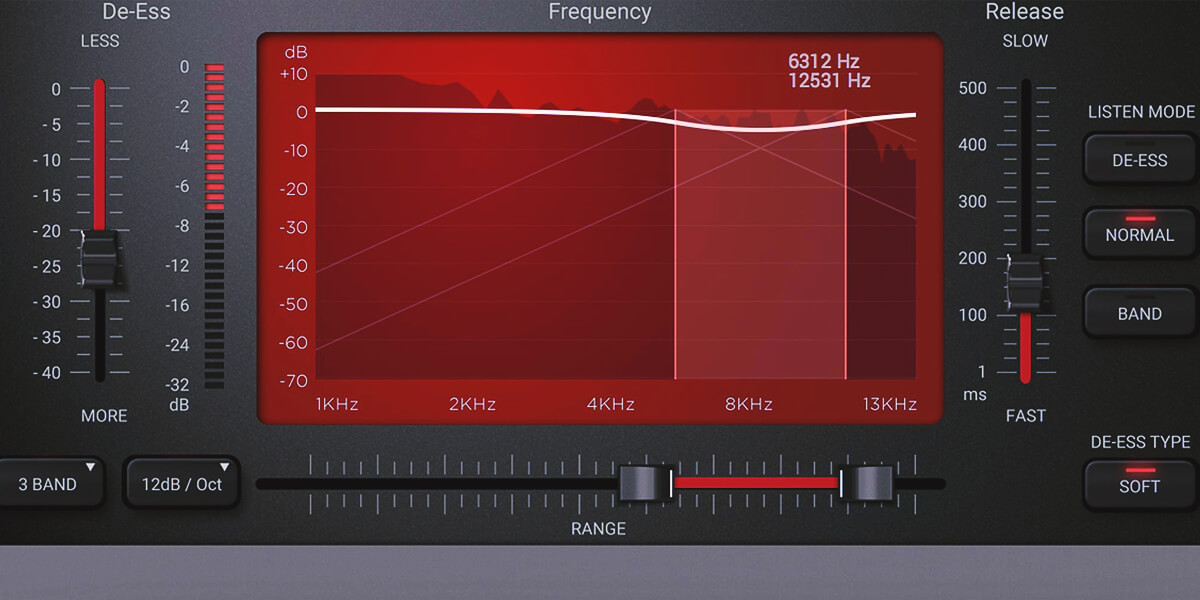
When addressing excessive sibilance, two primary methods stand out: wide-band and split-band.
- Wide-band approach: Acting globally, this technique impacts the entire audio signal by reducing frequencies across the spectrum. Often used in vocal treatment, it maintains the natural timbre of the sound source since all frequencies are uniformly attenuated. However, this approach might not be as precise when dealing with specific frequency spikes.
- Split-band technique: In this method, the signal is divided into frequency bands. When a sibilant frequency surpasses a set threshold, only the chosen frequency range is attenuated. This technique suits various sources like vocals and instruments where sharp, high frequencies can be problematic. However, it may dull the sound due to the targeted suppression of upper frequencies.
It’s noteworthy that many de-esser plugins offer both wide-band and split-band processing. Selecting the right method depends on the audio source, the desired outcome, and the balance between maintaining natural sound and controlling sibilance. Experimentation and attentive listening are key to mastering this art.
Effective ways to apply a de-esser

Solving sibilance issues effectively involves a systematic approach. Here’s how to use a de-esser efficiently:
- Begin by identifying the frequency range responsible for sibilant sounds using a spectrum analyzer or your trained ears. This step is crucial in targeting the right frequencies.
- Once you’ve pinpointed the sibilant frequency, establish a threshold. This threshold dictates when the de-esser kicks in to reduce the sibilant volume. Ensuring it only affects sibilance is key.
- The range control determines how much the de-esser reduces the sibilant frequency. Precise adjustment is vital to maintain the natural quality of vocals or instruments while curbing sibilance.
- Applying de-essing within the mix context is essential. Fine-tune settings while listening to the mix. Tweaking the threshold and range during mixing ensures the de-esser’s optimal performance.
Mastering this art involves attentive listening and understanding the interplay between different settings. Ultimately, the goal is to create a mix where sibilance is controlled while preserving the overall sonic quality.
Alternative ways to use de-esser plugins: bonus tips
Beyond their primary function, de-esser plugins offer a range of creative possibilities for enhancing your mix. Here are some alternative ways to utilize these tools that go beyond the conventional:
- When dealing with intricate source material riddled with multiple problematic high frequencies, consider employing a sequence of de-esser plugins. Begin with a wide-band plugin to even out the overall high-frequency balance. Follow it up with a split-band approach to target specific trouble frequencies. The number of consecutive plugins you employ depends on the complexity of the track. However, the key lies in preserving the instrument’s natural sound while reducing harshness.
- Steering clear of excessive signal compression with a single plugin is pivotal to maintaining a natural sound. Fine-tune the threshold and range controls meticulously, ensuring the plugin only impacts sibilant frequencies while leaving the rest untouched.
- Adopt a dynamic approach to the process. During the mixing process, tune the plugin parameters to ensure its effectiveness. The “set and forget” approach won’t yield optimal results, as this process is dynamic and necessitates ongoing attention.
- The application isn’t exclusive to vocals; it can be a game-changer for other instruments, too. Tame the sharpness of electric guitars, cymbals, and synthesizers. Surprisingly, it can also assist in taming string noise on bass guitars, toning down cymbal brightness, and even mitigating boxy frequencies in kick drums.
- Extend your creative application by using this technique in saturation, delay, and reverb plugins present on your send buses. These plugins might inadvertently introduce high-frequency content that exacerbates sibilance. By implementing the technique in your send bus chain, you can attenuate excessive highs and achieve a more natural sonic blend.
Plugins, originally designed for managing sibilance, can prove invaluable across various mixing scenarios. Exploring these innovative techniques can add depth and nuance to your audio productions while maintaining a polished and balanced sound.
Alternatives for de-essing

When dealing with troublesome sibilance, it’s important to consider alternatives to standard de-essing methods. These approaches offer unique perspectives on handling the challenge of excess “de-esser frequency” without relying solely on dedicated plugins.
- Manual de-essing with automation: An alternative to plugin usage involves manual reduction of sibilance using volume automation. This entails switching to volume automation mode, identifying each sibilant frequency, and attenuating it by a few decibels. While time-intensive, this method can be effective for highly specific sibilant frequencies.
- Dynamic equalization: Dynamic equalization functions similarly to a standard equalizer but introduces the ability to compress or attenuate specific frequency ranges at the moment of their occurrence. This technique can be valuable for reducing sibilance in a more organic manner compared to traditional de-esser plugins. However, setting it up might be more intricate, demanding additional knowledge of both equalization and compression.
- Microphone selection for precorrection: An effective strategy to minimize sibilance even before it enters your digital audio workstation (DAW) involves selecting the right microphone for your vocals. Certain microphones are more prone to sibilance than others, and choosing a microphone with a smoother high-frequency response can help mitigate sibilant sounds. Experimenting with different microphones to find the one that best suits your voice is essential.
- Customized dynamic processing: Crafting your dynamic processing chain can be another option. By combining compressors, EQs, and limiters with nuanced settings, you can tailor a solution that effectively addresses sibilance while offering greater control over your signal’s timbre.
It’s important to note that while these alternatives can be effective, they might not always be necessary or suitable for every situation. The choice depends on your specific audio needs and mixing preferences. Trusting your ears and selecting the method that aligns with your audio goals is crucial.
Taming the sharp edges of sibilance is a skill that significantly enhances the quality of your recordings. As you master the art of de-essing, you gain control over the intricacies of sound, ensuring that vocals and instruments harmoniously coexist without the distraction of harsh frequencies.


![What exactly makes a song good? [The Hits Anatomy]](https://dopevst.com/wp-content/uploads/2023/08/what-makes-music-good-300x150.jpg)